Magento 2 RabbitMQ
With the advent of RabbitMQ support in Magento 2, the asynchronous messaging capabilities of Magento development have now become full-fledged. Let’s have a quick look at asynchronous messaging before we get to know how RabbitMQ works.
Asynchronous Messaging
Asynchronous Messaging is serial communication between two systems. The initiating system puts messages in a queue and proceeds to work on its other processes without waiting for an immediate response. Imagine a system where the sender and receiver need not be continually connected other than loose bindings based on rules of the message exchange. Just like how you would drop a mail in the postbox and the postman picks it up to eventually deliver to the addressee. One of the most popular asynchronous messaging protocols is the Advanced Message Queuing Protocol (AMQP).

RabbitMQ-for-asynchronous-messaging
Recently, we had run into a task of making our Magento application transmit information to multiple applications and return quickly to its mainstream work. We turned to RabbitMQ – the lightweight yet feature-rich messaging solution which could also be deployed across distributed networks. It worked like a charm and was able to reduce the burden on our core Magento application and took care of sending the messages to appropriate third-party applications. Soon it was helping our application scale-up and process 1,00,000 requests at ease from 25,000 earlier.
What is this RabbitMQ and how does it work?
RabbitMQ is a message broker which primarily uses AMQP for processing communications between 2 applications. It is a middleman where Queues can be defined and applications can connect to the Queues to pull the messages. Some tasks might be time-consuming. There would also be a need to handle multiple requests. The message broker puts these tasks into corresponding queues for the other application to process these independently.
Message Queuing allows web servers to respond quickly to requests and delegate them to a third party for processing rather than perform the task instantaneously. This helps in handling multiple, resource-intensive requests efficiently.
Components of RabbitMQ Architecture:

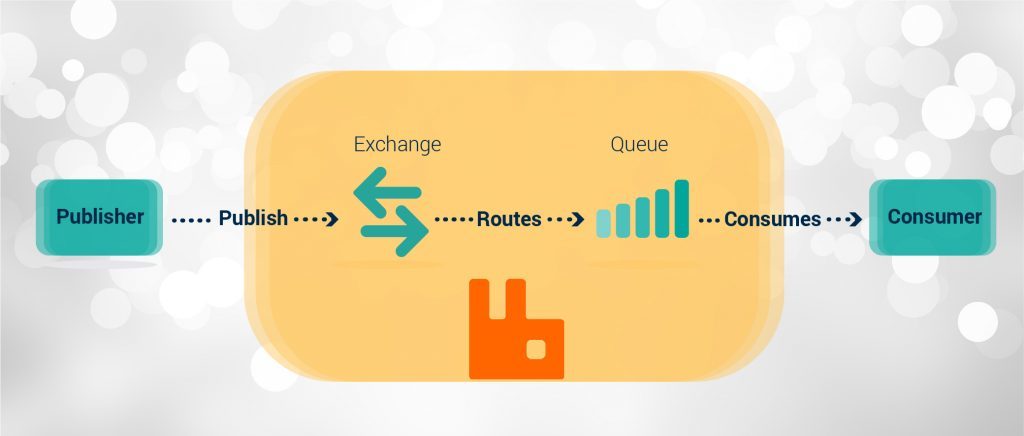
RabbitMQ-components
- Producer – The application or component which takes the requests from the users and pushes to the exchange. A request can either be a task, simple broadcast information or a file
- Exchange – The Exchange takes the request and sends to the queues based on Exchange Type and rules for routing called ‘Bindings’
- Queue – These queues hold on to the request/information until the appropriate Subscriber requests for the information. The Queues are bound to exchanges identified by the ‘Binding Key’
- Consumer – These are dedicated systems that pull information from the queue and process them independently
Types of Exchange:
Topic Exchange – Messages are routed based on a wildcard search result of the routing key with the binding key.
Headers Exchange – Messages are routed based on the Message Header with the Binding Header of the Queue.
| Direct Exchange | Messages are routed to the corresponding queue by exactly matching the binding key of the queue to the routing key of the message. This is the default exchange type of RabbitMQ. |
| Fanout Exchange | Messages are routed to all the queues bound to the exchange. |
RabbitMQ in Magento 2
Magento 2 added asynchronous messaging capabilities with the implementation of RabbitMQ. Magento Commerce and Magento open-source use RabbitMQ to manage message queues. As of Magento release 2.3.0, RabbitMQ can also be used on Magento open source installations.
Magento was using MySQL adapters for messaging and cron jobs to ensure delivery of messages. This wasn’t reliable and scalable.
RabbitMQ could typically be used in situations where Magento needs to communicate with an ERP System or a dedicated logistics application. In a real-world scenario, using RabbitMQ would allow us to decouple an ERP integration process from the customer order fulfilment process. For example, when Magento triggers an Order Creation event, we would just pass the order id (message) into the order export message queue (publisher) and let the order complete normally. Now RabbitMQ queues the order ids (messages) until another process (consumer) takes an order id (message) and processes that order in its ERP System. Use RabbitMQ to get back messages from the other systems into Magento 2. With the Consumer now running as a background process, we have great scalability, flexibility in runtime and better error handling.
Read also: 5 Of The Best Magento Extensions For Your Online Store
Possibilities for Implementing RabbitMQ in Magento 2 are huge:
A lot of scheduled tasks (cronjobs) in Magento can now be queued and processed asynchronously using RabbitMQ. With the growth of e-commerce and increasing volume of orders, message queuing helps by decoupling resource-intensive processes. Furthermore, this improves the frontend response time giving a better user experience.
Now let’s see how to set up RabbitMQ and establish an asynchronous communication between a Publisher and a Consumer in Magento 2.
Configure RabbitMQ
Define the environment variables in the environment file located at ‘app/etc/env.php’
'queue' => [
   'amqp' => [
       'host' => '127.0.0.1',
       'port' => '5672',
       'user' => 'guest',
       'password' => 'guest',
       'virtualhost' => '/',
       'ssl' => false
   ]
]
Setup the channel and type of message to communicate:
"communication.xml"

<topic name="sample_topic_name" request="string"/>
Setup the exchange and bind the topic to the queue with a Binding Key:
Interestingly, we have taken the TOPIC exchange type for example which is more flexible and adds scalability to the application.
File: queue_topology.xml
<exchange name="sample_exchange" type="topic" connection="amqp" autoDelete="true" durable="true" >

   <!-- publisher -->

   <binding id="bindingid_publisher"   topic="sample_topic_name"  destinationType="queue" destination="queue-name"/

</exchange>
Set up the publisher and link to an exchange:
File: queue_publisher.xml
<publisher topic=”sample_topic_name”>
<connection name=”amqp” exchange=”sample_exchange”/>
</publisher>
As a matter of factly, we have now completed establishing the exchange and publisher, we will now setup the consumer side of communication channel.
Consumer Queue:
File: communication.xml
<topic name=”sample_topic_name” request=”string”/>
File: queue_topology.xml
<exchange name=”sample_exchange” type=”topic” connection=”amqp” autoDelete=”true” durable=”true” >
<!– consumer –>
<binding id=”bindingid_consumer” topic=”sample_topic_name” destinationType=”queue” destination=”queue-name”/>
</exchange>
File: queue_consumer.xml
<consumer name=”consumer-name” queue=”queue-name” connection=”amqp” handler=”className methodname” consumerInstance=”Magento\Framework\MessageQueue\BatchConsumer”/>::
Using the Publisher to push a message in Magento:
use Magento\Framework\MessageQueue\PublisherInterface;
public function __construct(
PublisherInterface $publisher
) {
$this->publisher = $publisher;
}
public function publishData()
{
$message = “test message”;
$this->publisher->publish(‘ sample_topic_name ‘, $message);
}
Run the Consumer from Terminal:
bin/magento queue:consumers:list
bin/magento queue:consumers:start [–max-messages=<value>] [–batch-size=<value>] [–pid-file-path=<value>] [–area-code=<value>] <consumer_name>
Hope we were able to briefly explain about implementing RabbitMQ in Magento 2. The possibilities are now endless with the inclusion of RabbitMQ in Magento 2. Should you have any queries or feedback, please reach us on modulebazaar


